Contents
- 1 What You’ll Need
- 2 Step 1: Plan the Wainscoting Layout
- 3 Step 2: Cut and Install the Backer Board
- 4 Step 3: Cut and Install the Chair Rail, Molding, and Baseboard
- 5 Step 4: Fill in Gaps and Paint
- 6 Tips for Choosing and Installing Wainscoting
- 7 Benefits of Wainscoting
- 8 Wainscoting Ideas for Different Rooms
- 9 Wainscoting Paint Color Tips
Wainscoting is a decorative wood paneling that adds elegance and charm to any room. It also protects the wall from scuffs and dents. You might think that installing wainscoting is a complicated and expensive project, but you can do it yourself with some basic tools and materials. Here’s how to DIY wainscoting in four easy steps.
What You’ll Need
- Electric miter saw
- Cordless brad nailer
- Cordless drill
- Laser level
- Square
- Putty knife
- Stud finder
- Pencil
- 1/4-inch smooth finished plywood, 4-foot by 8-foot
- Chair rail
- 1 1/4-inch molding
- 3 1/4-inch baseboard
- 1-inch wide painter’s tape
- Drywall joint compound
- 1/4-inch electrical receptacle box extensions
Step 1: Plan the Wainscoting Layout
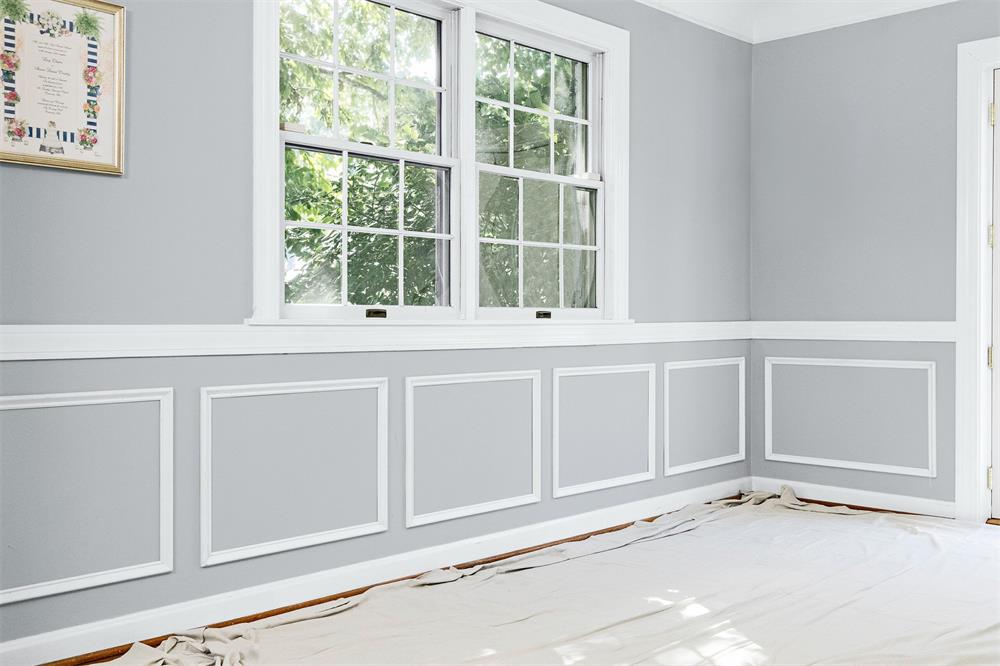
First, you need to decide how high and wide you want your wainscoting to be. A common height is between one-half and one-third of the wall height, but you can adjust it according to your preference and ceiling height. For this project, we’ll use a height of 36 inches.
Next, you need to determine how many panels you want to create on each wall. The panels should be evenly spaced and sized, and they should cover the entire wall. Ending the wainscoting mid-point in a wall will look unfinished. For this project, we’ll use three panels per wall, each 24 inches wide and 18 inches high.
To help you visualize the layout, use painter’s tape to mark the outline of the wainscoting on the wall. Start with a horizontal strip at 36 inches high for the chair rail, and another horizontal strip at 4 inches above the floor for the top of the baseboard. Then, use the tape to create three vertical strips for each panel, leaving some space between them.
Step 2: Cut and Install the Backer Board
The backer board is a sheet of plywood that forms the base of the wainscoting. You need to cut it to fit the height and width of your wainscoting layout.
Using a circular saw or a table saw, cut the plywood sheet into strips that are 36 inches high and 8 feet long. You may need more than one strip depending on how many walls you are covering.
Next, use a stud finder to locate and mark the studs on the wall. Then, use a cordless drill to attach the backer board strips to the wall with screws, making sure they are level and aligned with the painter’s tape outline. If you have any electrical outlets on the wall, you need to cut out holes for them on the backer board using a jigsaw or a hole saw. You also need to install electrical receptacle box extensions to bring them flush with the backer board.
Step 3: Cut and Install the Chair Rail, Molding, and Baseboard
The chair rail, molding, and baseboard are the trim pieces that create the wainscoting panels and frame. You need to cut them to fit your wainscoting layout using a miter saw.
For the chair rail, measure and cut a piece that is 8 feet long or as long as your wall. Then, use a brad nailer to attach it to the top edge of the backer board, making sure it is level and flush with the painter’s tape outline.
For the molding, measure and cut four pieces for each panel using 45-degree angles on both ends. These pieces will form a picture frame-style box on the backer board. Then, use a brad nailer to attach them to the backer board, making sure they are aligned with the painter’s tape outline.
For the baseboard, measure and cut a piece that is 8 feet long or as long as your wall. Then, use a brad nailer to attach it to the bottom edge of the backer board, making sure it is level and flush with the painter’s tape outline.
Step 4: Fill in Gaps and Paint
The final step is to fill in any gaps or nail holes with drywall joint compound using a putty knife. Let it dry completely and then sand it smooth with fine-grit sandpaper.
Now you can paint your wainscoting with your desired color using a roller or a brush.
Tips for Choosing and Installing Wainscoting
Wainscoting can enhance the look and feel of any room, but it also requires some planning and preparation. Here are some tips to help you choose and install wainscoting successfully.
- Consider the style and proportion of your room. Wainscoting should match the architectural style and period of your home, as well as the function and mood of the room. For example, raised panel wainscoting is more formal and traditional, while beadboard wainscoting is more casual and cottage-like. You should also consider the height and width of your walls, and adjust the size and spacing of your panels accordingly. A common rule of thumb is to make the wainscoting height one-third of the wall height, but you can vary it depending on your preference and ceiling height⁴.
- Choose the right materials and tools. Wainscoting can be made from various materials, such as solid wood, plywood, MDF, PVC, or vinyl. Each material has its pros and cons in terms of cost, durability, appearance, and ease of installation. You should also have the right tools for cutting, measuring, nailing, and painting your wainscoting. Some essential tools are a miter saw, a brad nailer, a cordless drill, a level, a square, a tape measure, a pencil, a putty knife, a sandpaper, a caulk gun, and a paint roller or brush.
- Prepare the wall surface and layout. Before installing wainscoting, you should prepare the wall surface by removing any wallpaper, nails, or outlet covers. You should also repair any cracks or holes with drywall compound and sand them smooth. Next, you should mark the layout of your wainscoting on the wall using painter’s tape or chalk lines. This will help you align your panels and trim pieces correctly and avoid mistakes. You should also use a stud finder to locate and mark the studs on the wall for attaching your wainscoting securely.
- Follow the installation steps carefully. Depending on the type of wainscoting you choose, you may need to follow different installation steps. However, some general steps are to start from one end of the wall and work your way to the other end; cut and install the backer board first if you are using one; cut and install the chair rail, molding, and baseboard next; fill in any gaps or nail holes with caulk or wood filler; sand any rough edges or excess filler; and paint your wainscoting with your desired color.
Benefits of Wainscoting
Wainscoting is not only a decorative feature, but also a practical one. Here are some benefits of wainscoting that you may enjoy:
- Wainscoting adds character and charm to any room. It can create a focal point, a contrast, or a harmony with the rest of the decor. It can also make a room look more cozy, elegant, or sophisticated, depending on the style and color of the wainscoting.
- Wainscoting protects the wall from damage. It can prevent scuffs, dents, scratches, or stains from furniture, pets, or children. It can also cover up any existing flaws or imperfections on the wall surface. Wainscoting is easy to clean and maintain, as you can simply wipe it with a damp cloth or repaint it if needed.
- Wainscoting adds value to your home. Wainscoting can increase the appeal and attractiveness of your home to potential buyers. It can also make your home look more expensive and luxurious, as wainscoting is often associated with high-end homes and historic buildings. Wainscoting can also increase the insulation and soundproofing of your walls, which can save you money on energy bills and improve your comfort.
Wainscoting Ideas for Different Rooms
Wainscoting can be used in any room of your home, as long as you choose the right style, height, and color to suit the space. Here are some wainscoting ideas for different rooms that you can try:
- Dining Room: Wainscoting can create a formal and elegant atmosphere in your dining room. You can use raised panel wainscoting in a dark wood or paint color to contrast with the lighter wall color. You can also add some crown molding and a chandelier to complete the look.
- Living Room: Wainscoting can add some warmth and coziness to your living room. You can use beadboard wainscoting in a white or cream color to match with the cottage or farmhouse style. You can also add some pillows, rugs, and plants to make the room more inviting.
- Bathroom: Wainscoting can protect your bathroom walls from moisture and mold. You can use flat panel wainscoting in a gray or blue color to create a modern and sleek look. You can also add some mirrors, towels, and accessories to brighten up the space.
- Bedroom: Wainscoting can make your bedroom more comfortable and relaxing. You can use board and batten wainscoting in a green or purple color to create a soothing and calming effect. You can also add some curtains, lamps, and artwork to personalize the space.
Wainscoting Paint Color Tips
One of the most important decisions you’ll have to make when installing wainscoting is what paint color to use. The paint color can affect the mood, style, and appearance of your room, so you’ll want to choose wisely. Here are some tips to help you pick the best paint color for your wainscoting:
- Consider the contrast. One way to create a striking and dramatic look with wainscoting is to use a contrasting paint color for the upper and lower parts of the wall. For example, you can use a dark color for the wainscoting and a light color for the wall, or vice versa. This can make the wainscoting stand out and add some depth and interest to the room. However, if you prefer a more subtle and harmonious look, you can use a similar or complementary paint color for both parts of the wall. This can make the room look more spacious and cohesive.
- Consider the style. Another factor to consider when choosing a paint color for your wainscoting is the style of your room and your home. Different paint colors can evoke different styles and moods, so you’ll want to match your wainscoting color with your desired style. For example, if you want a traditional and formal style, you can use classic colors like white, cream, gray, or navy. If you want a modern and sleek style, you can use trendy colors like black, blue, or green. If you want a casual and cozy style, you can use warm colors like beige, yellow, or red.
- Consider the lighting. A final factor to consider when choosing a paint color for your wainscoting is the lighting of your room. Different lighting conditions can affect how your paint color looks on the wall, so you’ll want to test your paint color in different times of the day and with different sources of light. You can use paint swatches or samples to see how your paint color changes under natural and artificial light. You can also use a paint app or tool to visualize how your paint color will look on your wall before buying it.